Kirsten-Kone
The Turning Problem: October 2010 update at bottom
When hollowing a vessel, the piece must be mounted to the drive spindle at one end to allow tool access in the other. This mounting is typically accomplished in one of two ways. First, the turner puts a tenon at the end of the vessel for a chuck to grip, or second, the turners leave extra waste wood at the end for faceplate mounting. In either case, the tenon/waste wood can be cut away when the vessel is finished or it can be incorporated into the bottom of the vessel. The Kirsten Kone jig was developed for final shaping of the foot of enclosed vessels. The design of the jig is such that the forces used to hold the piece will not be transmitted into the mouth and sides of the vessel. An enclosed vessel, if supported between the base and the mouth, can be compressed, causing it to break at its mouth or in its curved shoulder. One way to avoid this undesirable compression is to chuck a long blank and to turn it into a mandrel that just barely clears the mouth of the vessel and yet reaches all the way to the bottom of the vessel so that the squeezing effect is at the inside bottom of the vessel instead of its sides and mouth. The drawbacks of this technique, of course, are that each mandrel must be custom-turned for each vessel. Besides the time needed to create the mandrel, you must retain turning stock for this sacrificial purpose. Additionally, it is very difficult to turn the mandrel to precisely the correct diameter at the mouth so that it doesn’t rattle around. The task typically requires several remountings before the fit is good enough.
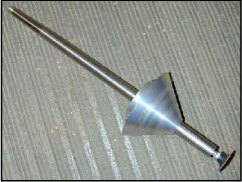
The “Kirsten Kone”:
The “Kirsten Kone” does the same thing by basically transmitting the drive forces away from the mouth and sides of the vessel and into its bottom. This is accomplished by the long shaft of the jig pressing on the inside of the vessel’s bottom while the tailstock presses on the outside of the bottom. All of the compression forces, therefore, are through the solid wood of the bottom instead of throughout the vessel’s mouth and sides. The real advantage of the “Kirsten Kone” design is that the sliding cone will engage the mouth of the vessel and provide just enough pressure to keep the mouth from rattling around while the foot is being turned without pressing too hard on the mouth. The “Kirsten Kone” has a 1⁄4” hole bored in the end with a set screw so that an old 1” or 2” snading mandrel can be inserted into the end of the shaft. By applying a 120 grit sanding disk to the sanding mandrel, there is enough friction to turn the vessel when the tailstock provides pressure from the outside of the bottom. A 1⁄4” thick rubber disk glued on the end of the mandrel also works well. Sanding disks are preferred over rubber, however, because the rubber can leave “skid marks” at the bottom. Finally, the entire jig is fitted to the drive spindle with a #2 Morse taper. This design ensures that the shaft runs true to the headstock.
Using the Kone:
This jig works best if the enclosed vessel has been fully turned inside and out, and sanded between centers, with the only remaining task being the removal of the chuckmounting tenon at the vessel’s base. The key to success is that the base of the vessel retains the tailstock cup point from the original between centers turning activity. By keeping the center point on the vessel throughout the turning process, you maintain a center reference for final mounting with the jig.
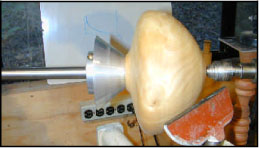
Begin by mounting the M2 taper end in the headstock. Choose an appropriate end diameter disc with sand paper that will easily fit through the mouth of the vessel to be finished. Align the exterior tailstock cup to the dimple on the bottom of the vessel and tighten the tailstock until the jig’s sanding/rubber disk is compressed inside the vessel. Once it is good and tight, slide the cone forward to the vessel mouth and straighten the vessel with enough pressure to eliminate rattling and then tighten the Kone screw. Once this is done, do not tighten with the tailstock again!!!!! If you tighten the tailstock more, the Kone will wedge tighter into the vessel’s mouth and may cause the vessel to split at the mouth. Once the vessel is set up, you can then turn away the remainder of the mounting tenon except for the nub where the tailstock point is located. Remember that all torque loading is via friction, so take light cuts to remove the tenon material. The foot can be shaped as desired with a flat or concave design. The bottom can be final sanded right up to the nub as well. Alternately, the tenon/waste wood can be blended into the bottom of the vessel if you want to retain that wood as part of the vessel. As in any blending operation, you will have to resand and refinish the blended area. Once the final tenon nub is all that is left, dismount the vessel and carefully cut the remaining nub with a small bench chisel or gouge. Then, hand-sand the small spot where the nub was attached.
Problems to Avoid:
Wood is relatively elastic and even though the tailstock cup is aligned to the base where it made its impression, sometimes the live center will move radially when other wood is removed during the hollowing process. As a result, the base may be a bit off-center when mounted on the jig. If this occurs, the tailstock point can be relocated at the bottom by trail and error until the vessel turns true. During this trial and error, do not set the Kone tightly into place. Wait until the final centering is complete before engaging the Kone. If the off-centeredness is very slight, the base of the vessel can be turned true the two surfaces blended by appropriate sanding. Another potential problem is that the mouth of the vessel will become oval due to drying or natural wood movement. The jig may not seat properly into an irregular mouth. If this occurs, there are several tricks to try. If the Kone fits part of the way around, but there is a gap on the other, a small wooden wedge or hard rubber filler can be fitted into the gap and taped in place with tape that doesn’t stretch (duct tape is good, but electrical tape will stretch). Another solution is that the Kone can be wrapped with rubber prior to insertion into the mouth. The rubber will fill the irregular mouth. Sometimes, the Kone may slip on the vessel causing burn marks on the mouth or metal marks if the cone is aluminum. This typically occurs when you try to take aggressive cuts. Only cut the mounting tenon with light cuts so that the vessel does not slip. If you are having a Kone made, make the cone from cheap plastics such as Polypropylene, Polyethylene or PVC instead of aluminum.
How to Obtain a Kirsten Kone: as of October 2010
Oskar has finally decided to commision a limited run of Kone assemblies and has received them, checked them and flight tested them and are ready to ship.
The new price had to be upgraded for material and machining costs. The base price is $ 64.00 US and $15 dollars shipping and handing via UPS state side anywhere. To get one on order, contact “rufuskirs@aol.com. ” send a check and one will be on it’s way.
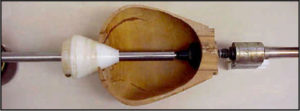
Cut Away View of the Kirsten Kone (This is an early prototype design)